
- Requirements
- Setting Up the backend environment
- Creating the project with Spring Initializr
- Spring Boot JPA Configuration
- Summary
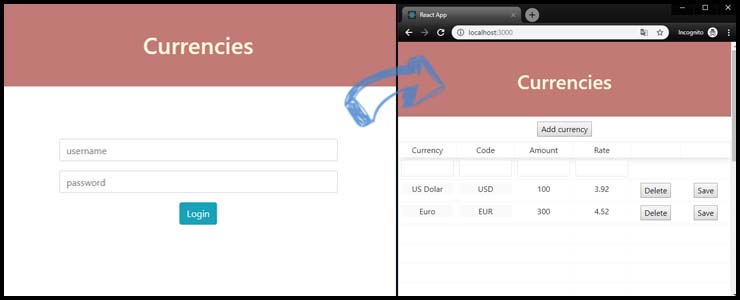
In this series, we will create a modern web application using Spring Boot 2.1.5 and React. We will start from the backend creating an API in Spring Boot and using the PostgreSQL database. The frontend will be created using the React.
The application that we will develop will be a currency portfolio. We will be able to add, edit and delete currencies from the database. In addition, we will secure our application using the JWT token, so that we only have access to our data.
Requirements
- Java knowledge
- Basic Spring Boot knowledge
- Basic JavaScript knowledge
- Basic Maven knowledge
- Basic knowledge of SQL databases
Setting Up the backend environment
We are going to create and run Spring Boot project. To do this you must have Java SDK installed (version 8 or higher) any IDE (I will use Intellij).
Creating the project with Spring Initializr
We will create the Spring Boot project with Spring Initializr. It is a web tool that’s used to create Spring projects. You can use web-based initializr (https://start.spring.io/) or provided by IDE (in the case of Intellij).
We will generate a Maven project with the latest Spring Boot version (2.1.5). In the Dependencies section, we will select dependencies that are needed in our project. Please start with following dependencies:
- Web: Spring Web Starter
- JPA: Spring Data JPA
- H2 Database
- PostgreSQL Driver
- Lombok
- Spring Boot DevTools
The DevTools provides facilities for developers (e.g. automatic restart after changes). Development is much faster because the application is automatically restarted after new changes have been detected.
After all, your pom.xml should look something like this:
<?xml version="1.0" encoding="UTF-8"?>
<project xmlns="http://maven.apache.org/POM/4.0.0" xmlns:xsi="http://www.w3.org/2001/XMLSchema-instance"
  xsi:schemaLocation="http://maven.apache.org/POM/4.0.0 http://maven.apache.org/xsd/maven-4.0.0.xsd">
    <modelVersion>4.0.0</modelVersion>
    <parent>
        <groupId>org.springframework.boot</groupId>
        <artifactId>spring-boot-starter-parent</artifactId>
        <version>2.1.5.RELEASE</version>
        <relativePath/> <!-- lookup parent from repository -->
  </parent>
    <groupId>net.devdiaries</groupId>
    <artifactId>wallet</artifactId>
    <version>0.0.1-SNAPSHOT</version>
    <name>wallet</name>
    <description>Application for devdiaries.net</description>

 <properties>        <java.version>12</java.version>
    </properties>

    <dependencies>
        <dependency>
            <groupId>org.springframework.boot</groupId>
            <artifactId>spring-boot-starter-web</artifactId>
        </dependency>

        <dependency>
            <groupId>org.springframework.boot</groupId>
            <artifactId>spring-boot-devtools</artifactId>
            <scope>runtime</scope>
            <optional>true</optional>
        </dependency>
        <dependency>
            <groupId>org.springframework.boot</groupId>
            <artifactId>spring-boot-starter-data-jpa</artifactId>
            <version>2.1.5.RELEASE</version>
        </dependency>
        <dependency>
            <groupId>com.h2database</groupId>
            <artifactId>h2</artifactId>
            <version>1.4.199</version>
            <scope>runtime</scope>
        </dependency>
        <dependency>
            <groupId>org.projectlombok</groupId>
            <artifactId>lombok</artifactId>
            <version>1.18.8</version>
            <scope>provided</scope>
        </dependency>
        <dependency>
            <groupId>org.postgresql</groupId>
            <artifactId>postgresql</artifactId>
            <version>42.2.5</version>
        </dependency>
        <dependency>
            <groupId>org.springframework.boot</groupId>
            <artifactId>spring-boot-starter-test</artifactId>
            <scope>test</scope>
        </dependency>
    </dependencies>

    <build>
        <plugins>
            <plugin>
                <groupId>org.springframework.boot</groupId>
                <artifactId>spring-boot-maven-plugin</artifactId>
            </plugin>
        </plugins>
    </build>
 </project>
If you do not want to generate a project in the initializr - you can use my pom.xml.
Initializer has generated a directory structure with the main application class:

WalletApplication.java:
@SpringBootApplication
public class WalletApplication {

 public static void main(String[] args) { SpringApplication.run(WalletApplication.class, args); }
}
In addition to the usual class with the main() method, you probably noticed the @SpringBootApplication annotation. It is a combination of multiple annotations. The most important of them are:
@EnableAutoConfiguration - tells Spring Boot how you will want to configure Spring, based on the jar dependencies that you have added to the pom.xml.
@ComponentScan - tells Spring to look for other components, configurations, and services in the specified package.
@Configure - Defines the class that can be used as a source of bean definitions.
Spring Boot JPA Configuration
Now, we will create a database by using JPA. Firstly, we will use H2 in-memory SQL database (good for fast development, we do not have to run any databases - Spring will do it for us, storing data in memory).
JPA and Hibernate
JPA (Java Persistent API) provides object-relational mapping for Java applications. In the case of databases, we are talking about entities and therefore the most important annotation in the case of JPA is @Entity. The @Entity class presents the structure of a database table and the fields of an @Entity class present the columns.
Hibernate is the most popular JPA implementation and is used in Spring Boot by default.
Creating the entity classes in Spring Boot
Entity classes use the standard JavaBean naming convention and have getters/setters. All fields have private visibility.
JPA creates tables with the names of the classes. If you want to use another name for the table, you should use @Table annotation
Let’s create a package for our Entity class and classes related to retrieving records from the database (repositories). We will use domain name: net.devdiaries.wallet.domain. Next, we create entity classes - Our database will contain currency portfolios. My Currency.java class:
package net.devdiaries.wallet.domain;

import lombok.Getter;
import lombok.Setter;

import javax.persistence.*;
import java.math.BigDecimal;

@Entity
@Getter
@Setter
public class Currency {

 public Currency(String name, String code, BigDecimal amount, BigDecimal rate) {        this.name = name;
        this.code = code;
        this.amount = amount;
        this.rate = rate;
    }

    @Id
    @GeneratedValue(strategy = GenerationType.AUTO)
    private long id;

    private String name;

    private String code;

    private BigDecimal amount;

    private BigDecimal rate;

  }
The @Id annotation defines the primary key. The @GeneratedValue tells that the ID is automatically generated by the database. We use AUTO strategy. It means that the JPA provider selects the best strategy for a particular database.
Instead of creating getters/setters methods, we used Lombok (@Getter, @Setter), which will create it for us during compilation.
We already have a class that will create a table with columns in the database. Now it’s time to create Repository class - which provides functionality for Creating/Removing/Updating/Deleting data from the database. We will start from repository for Currency class:
package net.devdiaries.wallet.domain;

import org.springframework.data.repository.CrudRepository;

public interface CurrencyRepository extends CrudRepository<Currency, Long> {
}
CurrencyRepository extends the CrudRepository<Currency, Long>. It defines that this repository is for the Currency entity class and the type of Id is long.
CrudRepository provides multiple CRUD methods. Most important of them:
| Method | Description |
|---|---|
| long count() | returns number of entities |
| < S extends T > save(S entity) | saves an entity |
| Iterable | returns all records of provided type |
| Optional | returns one record for given ID |
| void delete(T entity) | deletes entity |
Let`s check that everything is done correctly:
1 - Add settings to application.properties
spring.jpa.show-sql=true
spring.h2.console.enabled=true
spring.h2.console.path=/h2-console
It enables the H2 console and logs all Hibernate queries.
2 - Run WalletApplication application
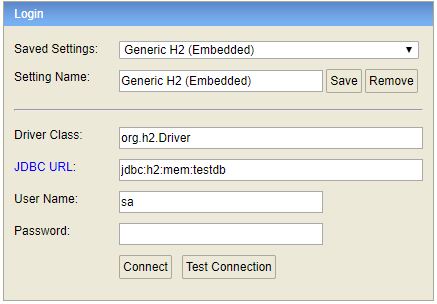
3 - Go to localhost:8080/h2-console and use jdbc:h2:mem:testdb as JDBC URL:
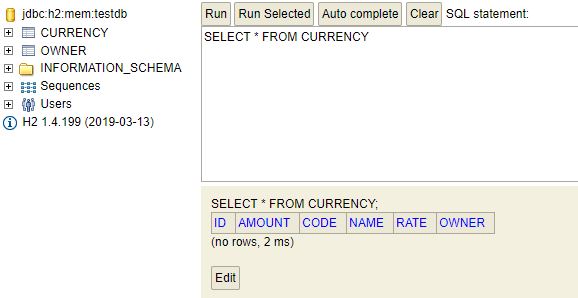
4 - Use SELECT * FROM CURRENCY query and click Run button. H2 console should return no rows:
Use CommandLineRunner to inject demo data
Now we will add some demo data to the H2 database. For that, we will use the CommandLineRunner class. This class provides the functionality to run specific pieces of code when the application is fully started. Let’s use it in the main application class:
@SpringBootApplication
public class WalletApplication {

 @Autowired private CurrencyRepository currencyRepository;

 public static void main(String[] args) {
    SpringApplication.run(WalletApplication.class, args);
    }

    @Bean
 CommandLineRunner runner() {
        return args -> {
//            Save demo data after start
            currencyRepository.save(new Currency("US Dolar", "USD", new BigDecimal(100), new BigDecimal(3.92)));
            currencyRepository.save(new Currency("Euro", "EUR", new BigDecimal(300), new BigDecimal(4.52)));
        };
    }
}
We injected CurrencyRepository using @Autowired which enables dependency injection (described in https://www.devdiaries.net/blog/Spring-Design-Patterns-Dependency-Injection/ post).
Next, we used the save() method from CrudRepository to save objects in the database.
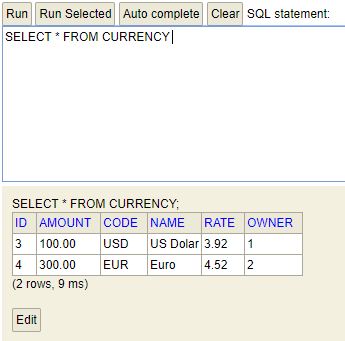
Now repeat the 4. point described above. You will see that new records have appeared in the database:
Hibernate logs:
Hibernate: call next value for hibernate_sequence
Hibernate: insert into currency (amount, code, name, rate, id) values (?, ?, ?, ?, ?)
Hibernate: call next value for hibernate_sequence
Hibernate: insert into currency (amount, code, name, rate, id) values (?, ?, ?, ?, ?)
Summary
The first part was done! In the next post, we will create a RESTful service. We will add the controller and use Spring MVC. The second part of the tutorial is available at PART 2.