Our application works quite well, but we would like to use the REST principles and manage data via HTTP requests.
In Spring Boot, HTTP requests are handled by controller classes.
In the previous post, we have created an application that automatically creates a database and adds some data to it. Let’s add controllers to it!
REST basics
REST (Representational State Transfer) is an architectural style for designing distributed systems. It’s not a standard, but it defines a set of constraints such as being stateless or having a client/server relationship. The six constraints defined by Roy Fielding (REST creator):
- Stateless: The server doesn’t hold any information about users,
- Cacheable: Many users request the same resources. It is useful to cache responses,
- Uniform interface between components: This simplifies the architecture, as all components follow the same rules to speak to one another,
- Layered system: individual components cannot see beyond the immediate layer with which they are interacting,
- Client-server architecture: the client and the server both have a different set of concerns. The server does not send any information without a request from the client,
- Code on demand: code may be downloaded to extend client functionality. This is an optional constraint.
RESTful Spring Boot service
In Spring boot all requests are handled by controller classes. We have to create our own controller class. To do this, let’s first create the java package for our controller (I created net.devdiaries.wallet.controllers package). Next, create the controller class: CurrenciesController.java.
Now, add the @RestController annotation before the class definition.
@RestController is used to mark classes as Spring MVC Controller. Our controller class looks like this:
package net.devdiaries.wallet.controllers;

import org.springframework.web.bind.annotation.RestController;

@RestController
public class CurrencyController {

}
To be able to return currencies from the database, we have to inject CurrencyRepository created in previous post.
We will also add a method with the @RequestMapping annotation, which will fetch all currencies from CurrencyRepository. @RequestMapping maps the URL address and/or HTTP method to the controller. Now our code looks like this:
package net.devdiaries.wallet.controllers;

import net.devdiaries.wallet.domain.Currency;
import net.devdiaries.wallet.domain.CurrencyRepository;
import org.springframework.beans.factory.annotation.Autowired;
import org.springframework.web.bind.annotation.*;


@RestController
public class CurrencyController {

 private final CurrencyRepository currencyRepository;

 @Autowired
 public CurrencyController(CurrencyRepository currencyRepository) {
        this.currencyRepository = currencyRepository;
    }

 @GetMapping("/currencies")
 public Iterable<Currency> getCurrencies() {
        return currencyRepository.findAll();
    }
  }
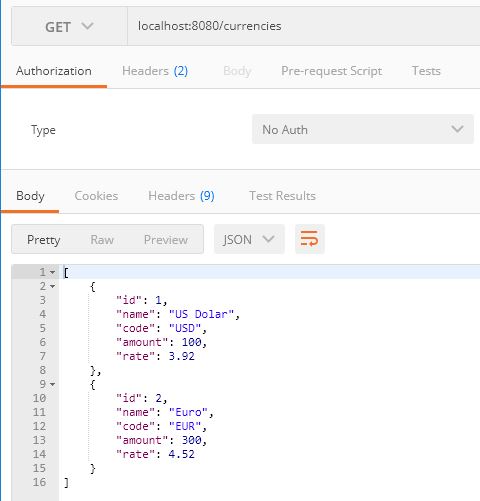
We are ready to run the application. After run navigates to localhost:8080/currencies. We can see that application get all the currencies from the database and return it in JSON format:
We must add a few more methods that we will need in our Wallet application.
1 - addCurrency() method marked by @PostMapping annotation:
@PostMapping("/currencies")
void addCurrency(@RequestBody Currency currency) {
    currencyRepository.save(currency);
}
Annotation @PostMapping ( "/currencies") maps the given path to the appropriate method that will handle the HTTP request (POST). @RequestBody annotation maps the HttpRequest body to a transfer or domain object (Currency object).
2 - updateCurrency() method which will be used to update the currency status:
@PutMapping("/currencies")
void updateCurrency(@RequestBody Currency currency) {
    currencyRepository.save(currency);
}
3 - deleteCurrency() method for removing Currency objects from database:
@DeleteMapping("/currencies/{id}")
void deleteCurrency(@PathVariable Long id) {
    currencyRepository.deleteById(id);
}
In deleteCurrency() we used the @PathVariable annotation that will retrieve the currency id from the URI.
The following source code shows the controller final code:
package net.devdiaries.wallet.controllers;

import net.devdiaries.wallet.domain.Currency;
import net.devdiaries.wallet.domain.CurrencyRepository;
import org.springframework.beans.factory.annotation.Autowired;
import org.springframework.web.bind.annotation.RestController;
import org.springframework.web.bind.annotation.GetMapping;
import org.springframework.web.bind.annotation.DeleteMapping;
import org.springframework.web.bind.annotation.PostMapping;
import org.springframework.web.bind.annotation.PutMapping;
import org.springframework.web.bind.annotation.PathVariable;
import org.springframework.web.bind.annotation.RequestBody;


@RestController
public class CurrencyController {

 private final CurrencyRepository currencyRepository;

 @Autowired
 public CurrencyController(CurrencyRepository currencyRepository) {
        this.currencyRepository = currencyRepository;
    }

 @GetMapping("/currencies")
 public Iterable<Currency> getCurrencies() {
        return currencyRepository.findAll();
    }

    @DeleteMapping("/currencies/{id}")
    void deleteCurrency(@PathVariable Long id) {
        currencyRepository.deleteById(id);
    }

    @PostMapping("/currencies")
    void addCurrency(@RequestBody Currency currency) {
        currencyRepository.save(currency);
    }

    @PutMapping("/currencies")
    void updateCurrency(@RequestBody Currency currency) {
        currencyRepository.save(currency);
}
}
Summary
Congratulations! That’s all. We have created a controller with which the frontend of our application will communicate via REST. In the next post, we will take care of securing the backend of our application. I invite you to read the next part.

