
- Requirements
- Creating the React project
- Changing the default appearance
- Creating CRUD functionalities
- Adding login functionality with JWT
- Summary
In previous posts, we have created a fully working application in Spring Boot 2. Now it’s time to create a frontend that will communicate with our backend. If you have not read previous posts, I invite you to read.
Requirements
- Node and NPM installed (You can download it from here)
Creating the React project
Before we start coding, we have to create React project:
- Open the shell terminal and execute the following command:
npx create-react-app wallet-ui - Type following command:
wallet-ui - Start npm by executing:
npm start
On the http://localhost:3000/ you should see the start page of the project in React:
Changing the default appearance
Our design will be very simple. Our app.js looks like this:
import React, {Component} from 'react';
import './App.css';

class App extends Component {
    render() {
        return (
            <div className="App">
                <header className="Header">
                    <h1 className="App-title">Currencies</h1>
                </header>
            </div>
        )
    }
}

export default App;
And the App.css file:
.App {
  text-align: center;
}

.Header {
  background-color: rgba(169, 67, 63, 0.71);
  height: 150px;
  padding: 55px;
  color: cornsilk;
}
Creating CRUD functionalities
Firstly, we will create a component with the currencies table with paging, filtering and sorting rows/columns. In previous posts, we have created localhost:8080/currencies in our backend. Now we will use it to list all currencies in the frontend.
We will start by creating a catalog for components. Create the components folder in the main project directory. Then create the Currencies.js file:
Currencies.js will be our React component. A React component is a JavaScript class or function that optionally accepts inputs i.e. properties(props) and returns a React element that describes how a section of the UI should appear:
import React, {Component} from 'react';

class Currencies extends Component {
    constructor(props) {
        super(props);
        this.state = {currencies: []};
    }

    render() {
        return (
            <div className="App">
            </div>
        );
    }
}

export default Currencies;
Now update the App.js adding a new component - the <Currencies /> :
import React, {Component} from 'react';
import './App.css';
import Currencies from "./components/Currencies";

class App extends Component {
    render() {
        return (
            <div className="App">
                <header className="Header">
                    <h1 className="App-title">Currencies</h1>
                </header>
                <Currencies/>
            </div>
        )
    }
}

export default App;
Fetching data from the backend
To connect via HTTP we will use the Fetch API. The Fetch API provides the fetch() method of which we pass the path to the HTTP resource. In our case, it will be the URL of the backend:
       fetch('http://localhost:8080/currencies')
            .then((response) => response.json())
            .then((responseData) => {
                this.setState({
                    currencies: responseData
                })
            })
That’s all we need to do to get data from the external API. But when the data should be fetched? The best place to fetch data is componentDidMount(). React’s lifecycle method. When this method runs, the component was already rendered with the render() method so we have a guarantee that data won’t be loaded until after the initial render.
There is one more thing to keep in mind. We have secured our application using JWT. The above use of the fetch() method will not work. We need to add the Authorization header with the generated jwt token.
I generated a JWT token with Postman, then I injected it as a header in the fetch() method (You must generate the JWT token yourself. I showed how to do it in the previous post).
Now, we will add a simple display of the data fetched from the backend:
import React, {Component} from 'react';
class Currencies extends Component {
constructor(props) {
super(props);
this.state = {currencies: []};
}
componentDidMount() {
fetch('http://localhost:8080/currencies', {headers: {"Authorization": "Bearer eyJhbGciOiJIUzUxMiJ9.eyJzdWIiOiJhZG1pbiIsImV4cCI6MTU2MTM4OTMyNn0.tVF719msAK-lanUq_Joupae5K1c80EKrjWSeuALFQPP2pyHM2nTDM54dBcB40IrhwU5zIVP3aR82fb6EJqEc6Q"} })
.then((response) => response.json())
.then((responseData) => {
this.setState({
currencies: responseData
})
})
.catch(err => console.error(err))
}
render() {
const tableRows = this.state.currencies.map((currency, index) =>
<tr key={index}>
<td>{currency.name}</td>
<td>{currency.code}</td>
<td>{currency.amount}</td>
<td>{currency.rate}</td>
</tr>
);
return (
<div className="App">
<table>
<tbody>{tableRows}</tbody>
</table>
</div>
);
}
}
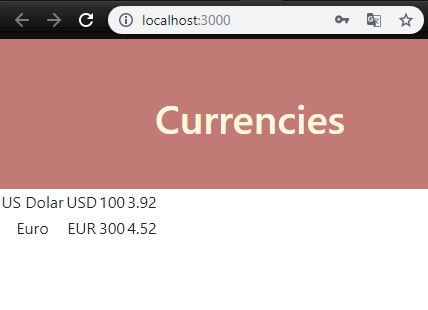
export default Currencies; Result:
Using the react-table to display data
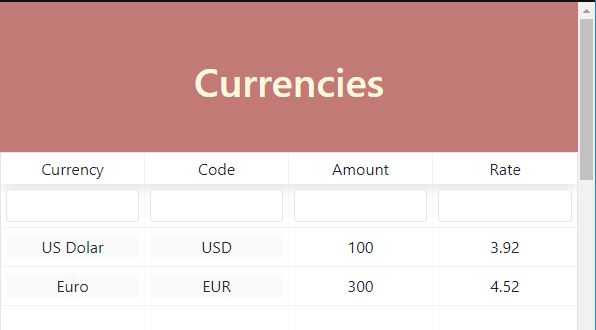
We will use React Table to display currencies. Reac Table allows to display tabular data client-side, and provides sorting, filtering, and pagination over that data. To install a react-table in our application, run the npm install reactable --save command in the main project directory and restart the application.
Now we have to remove the current table in the render() method and define the new one with react-table. If you want to configure the table in a different way, read the following doc: https://www.npmjs.com/package/react-table.
Updated render() method:
render()
{
const columns = [{
Header: 'Currency',
accessor: 'name',
Cell: this.editable
}, {
Header: 'Code',
accessor: 'code',
Cell: this.editable
}, {
Header: 'Amount',
accessor: 'amount'
}, {
Header: 'Rate',
accessor: 'rate'
}
,];
return (
<div>
<ReactTable data={this.state.currencies} columns={columns} filterable={true}/>
</div>
);
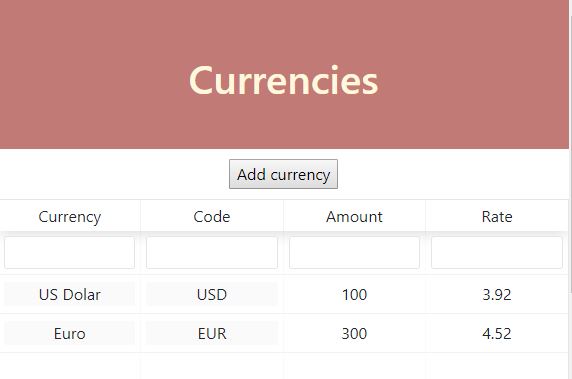
} The effect looks much better:
Add new currency functionality
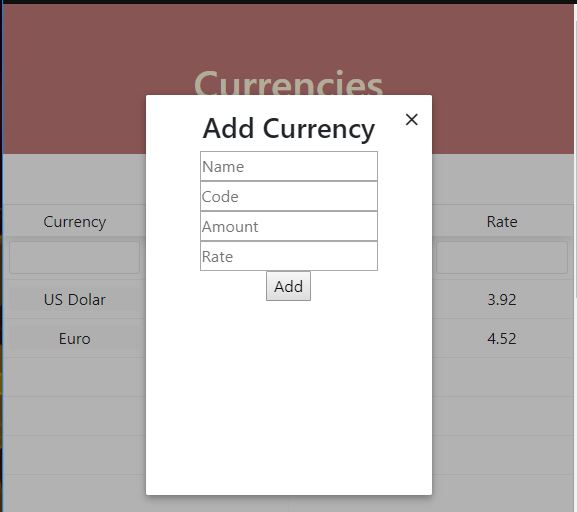
Let’s add functionality to adding new currencies. We will start with creating a new component - AddCurrency.js in the components directory.
We will implement an add functionality with React Skylight component. SkyLight is a simple react component for modals and dialogs. Install a component like a react-table: npm install react-skylight --save
The following source code shows the AddCurrency.js code:
import React, {Component} from 'react';
import SkyLight from 'react-skylight';

class AddCurrency extends Component {

 constructor(props) {        super(props);
        this.state = {name: '', code: '', amount: '', rate: ''};
    }

    handleChange = (event) => {
        this.setState(
            {[event.target.name]: event.target.value}
        );
    };

    handleSubmit = (event) => {
        event.preventDefault();
        var currency = {name: this.state.name, code: this.state.code, amount: this.state.amount, rate: this.state.rate};
        this.props.addCurrency(currency);
        this.refs.addDialog.hide();
    }

    render() {
        return (
            <div>
                <SkyLight hideOnOverlayClicked ref="addDialog">
                    <h3>Add Currency</h3>
                    <form>
                        <input type="text" placeholder="Name" name="name" onChange={this.handleChange}/><br/>
                        <input type="text" placeholder="Code" name="code" onChange={this.handleChange}/><br/>
                        <input type="text" placeholder="Amount" name="amount" onChange={this.handleChange}/><br/>
                        <input type="text" placeholder="Rate" name="rate" onChange={this.handleChange}/><br/>
                        <button onClick={this.handleSubmit}>Add</button>
                    </form>
                </SkyLight>
                <div>
                    <button style={ {'margin': '10px'} } onClick={() => this.refs.addDialog.show()}>Add currency</button>
                </div>
            </div>
        )
    }


}

export default AddCurrency;
We added the form inside the render(). It contains the Skylight component with buttons and the input fields for adding the currency. We also added a button that opens the modal window - it will be shown in the Currencies component.
Import the AddCurrency component inside the Currencies.js by adding:
import AddCurrency from './AddCurrency'; And update the render() method in the Currencies.js with addCurrency component:
return (
    <div>
        <AddCurrency addCurrency={this.addCurrency}  fetchCurrencies={this.fetchCurrencies}/>
        <ReactTable data={this.state.currencies}  columns={columns}  filterable={true}/>
    </div>
);
After refreshing the page you should see the “Add Currency” button. After clicking on it, you will see a window with inputs to complete:
Edit and Remove functionality
Currencies can be deleted/updated in the database by sending the DELETE/PUT HTTP method request to the backend. We will start by adding new columns with buttons to the react-table using Cell . We do not want to enable sorting and filtering functionalities for this column so we have to set props to false.
The final code of the table is shown below:
render() {

 const columns = [{
        Header: 'Currency',
        accessor: 'name',
        Cell: this.editable
 }, {
        Header: 'Code',
        accessor: 'code',
        Cell: this.editable
  }, {
        Header: 'Amount',
        accessor: 'amount'
  }, {
        Header: 'Rate',
        accessor: 'rate'
  }, {
        sortable: false,
        filterable: false,
        width: 100,
        Cell: row => (
            <div>
                <button onClick={() => this.onDelClick(row.original.id)}>Delete</button>
            </div>
        )
    }, {
        sortable: false,
        filterable: false,
        width: 100,
        Cell: row => (
            <div>
                <button onClick={() => this.updateCurrency(row.original)}>Save</button>
            </div>
        )
    }

 ,]
    return (
        <div>
            <AddCurrency addCurrency={this.addCurrency}  fetchCurrencies={this.fetchCurrencies}/>
            <ReactTable data={this.state.currencies}  columns={columns}  filterable={true}/>
        </div>
); }
Now, we have to implement two methods: onDelClick() and updateCurrency(). After each change, we need to re-collect currencies from the backend. In order not to repeat the code, let us move the functionality to fetch the data for the separate method fetchCurrencies():
fetchCurrencies = () => {
    fetch('http://localhost:8080/currencies',
        {headers: {"Authorization": "Bearer eyJhbGciOiJIUzUxMiJ9.eyJzdWIiOiJhZG1pbiIsImV4cCI6MTU2MTIyNDA3MH0._AdhZ_KDhWRmaxejYht9qtViH0TfouGUxQPCC12U_UPKLNYf7QafjtiP_BkSt8i_wNrHk4E4mzaPXErsjDH0_g", "Content-Type": "application/json"}})
        .then((response) => response.json())
        .then((responseData) => {
            this.setState({
                currencies: responseData
            })
        })
        .catch(err => console.error("error: " + err));
}
The onDelClick() method implementation:
onDelClick = (id) => {
    if (window.confirm('Are you sure to delete currency?')) {
        fetch('http://localhost:8080/currencies/' + id, {
            method: 'DELETE',
            headers: new Headers({
                "Authorization": "Bearer eyJhbGciOiJIUzUxMiJ9.eyJzdWIiOiJhZG1pbiIsImV4cCI6MTU2MTEwNTA0MH0.9PF5R4DA6rZQhoOLBn1l48VW4sgGmYjca8abazExtYxhCh9I5oV2z1_Ywalu46xioKph0Zo7OEXIb96WeNoALw"
  })
        }).then(res => this.fetchCurrencies())
            .catch(err => console.error(err));
    }
};
And the onDelClick() method implementation:
updateCurrency(currency) {
    fetch('http://localhost:8080/currencies', {
        method: 'PUT',
        headers: {
            "Authorization": yourJWT,
            "Content-Type": "application/json"
  },
        body: JSON.stringify(currency)
    })
        .then(res => this.fetchCurrencies())
        .catch(err => console.log(err))
}
Finally, we need to add the editable function, which will allow us to edit the table’s cells:
editable = (cell) => {
return (
<div style={ {backgroundColor: "#fafafa"} } contentEditable suppressContentEditableWarning onBlur={e => {
const curr = [...this.state.currencies];
curr[cell.index][cell.column.id] = e.target.innerHTML;
this.setState({currencies: curr});
}}
dangerouslySetInnerHTML={ {__html: this.state.currencies[cell.index][cell.column.id]} }
/>
);
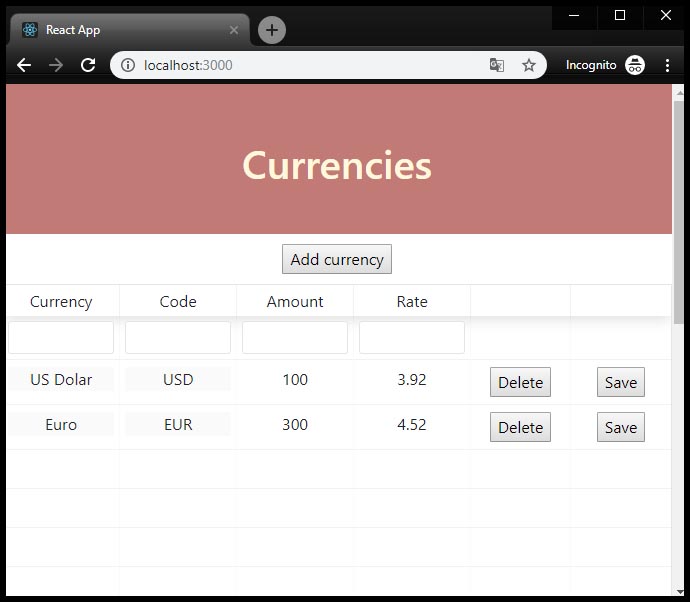
};Buttons appeared. The functionality for editing and deleting data works correctly!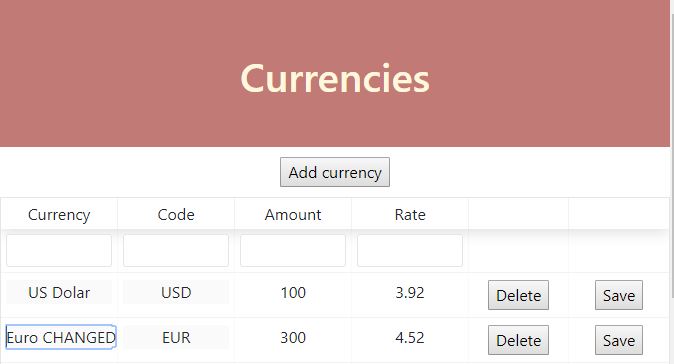
Adding login functionality with JWT
For the application to work properly, we still need to implement the user’s login functionality. Let’s start by creating a new Login.js component in the components folder:
import React, {Component} from 'react';

class Login extends Component {
    constructor(props) {
        super(props);
        this.state = {username: '', password: '', isAuthenticated: false, open: false};
    }

    render() {
        return (
            <div>
            </div>

        );
    }
}

export default Login;
We are going to use bootstrap styles in the Login page. Install the following component: npm install --save bootstrap and add import 'bootstrap/dist/css/bootstrap.min.css'; at the beginning of Login.js.
Update render() method by adding login form:
render() {
    if (this.state.isAuthenticated === true) {
        return (<Currencies />)
    }
    else {
        return (
            <div id="login">
                <h3 className="text-center text-white pt-5">Login form</h3>
                <div className="container">
                    <div id="login-row" className="row justify-content-center align-items-center">
                    <div id="login-column" className="col-md-6">
                     <div id="login-box" className="col-md-12">
                    <div className="form-group">
                        <input type="text" name="username" onChange={this.handleChange}  className="form-control" placeholder="username" />
                    </div>
                    <div className="form-group">
                        <input type="password" name="password" onChange={this.handleChange}  className="form-control" placeholder="password" />
                    </div>
                         <input type="submit" name="submit" onClick={this.login}  className="btn btn-info btn-md" value="Login"/>
                     </div>
                    </div>
                    </div>
            </div>
            </div>

 );} }
If the user is already authenticated (isAuthenticated is true), the Currencies component will be displayed. Let’s now implement the methods used in the form.
The handleChange() method for handling the changes from the form:
 handleChange = (event) => {
    this.setState({[event.target.name] : event.target.value});
}
And the login function:
 login = () => {
    const user = {userName: this.state.username, password: this.state.password};
    fetch("http://localhost:8080/" + 'login', {
        method: 'POST',
        body: JSON.stringify(user)
    })
        .then(res => {
            const jwtToken = res.headers.get('Authorization');
            if (jwtToken !== null) {
                sessionStorage.setItem("jwt", jwtToken);
                this.setState({isAuthenticated: true});
            }
            else {
                this.setState({open: true});
            }
        })
        .catch(err => console.error(err))
};
The login is done by calling the /login endpoint with the POST HTTP method (we are sending the user object inside the request body). If the backend authenticates the provided user, we get an Authorization header in the response. We get a JWT token and save to session storage.
Now we need to update App.js to display the <Login /> component instead of <Currencies />:
 import React, {Component} from 'react';
import './App.css';
import Login from './components/Login'

class App extends Component {
    render() {
        return (
            <div className="App">
                <header className="Header">
                    <h1 className="App-title">Currencies</h1>
                </header>
                <Login/>
            </div>
        )
    }
}

export default App;
We also have to update the Currencies.js so that each time we use thefetch()method, it retrieves the JWT from sessionStorage and sends it to the Authorization header. The following source code shows the Currencies.js final code:
import React, {Component} from 'react';
import ReactTable from "react-table";
import 'react-table/react-table.css';
import AddCurrency from './AddCurrency';
class Currencies extends Component {
constructor(props) {
super(props);
this.state = {currencies: []};
}
componentDidMount() {
this.fetchCurrencies();
}
onDelClick = (id) => {
const jwtToken = sessionStorage.getItem("jwt");
if (window.confirm('Are you sure to delete currency?')) {
fetch('http://localhost:8080/currencies/' + id, {
method: 'DELETE',
headers: new Headers({
"Authorization": jwtToken,
"Content-Type": "application/json"
})
}).then(res => this.fetchCurrencies())
.catch(err => console.error(err));
}
};
addCurrency(currency) {
const jwtToken = sessionStorage.getItem("jwt");
fetch('http://localhost:8080/currencies/', {
method: 'POST',
headers: {
"Authorization": jwtToken,
"Content-Type": "application/json"
},
body: JSON.stringify(currency)
})
.then(res => this.fetchCurrencies())
.catch(err => console.log(err))
}
updateCurrency(currency) {
const jwtToken = sessionStorage.getItem("jwt");
fetch('http://localhost:8080/currencies', {
method: 'PUT',
headers: {
"Authorization": jwtToken,
"Content-Type": "application/json"
},
body: JSON.stringify(currency)
})
.then(res => this.fetchCurrencies())
.catch(err => console.log(err))
}
editable = (cell) => { return (
<div style={ {backgroundColor: "#fafafa"} } contentEditable suppressContentEditableWarning onBlur={e => {
const curr = [...this.state.currencies];
curr[cell.index][cell.column.id] = e.target.innerHTML;
this.setState({currencies: curr});
}}
dangerouslySetInnerHTML={ {__html: this.state.currencies[cell.index][cell.column.id]} }
/>
);
}
render() {
const columns = [{
Header: 'Currency',
accessor: 'name',
Cell: this.editable
}, {
Header: 'Code',
accessor: 'code',
Cell: this.editable
}, {
Header: 'Amount',
accessor: 'amount'
}, {
Header: 'Rate',
accessor: 'rate'
}, {
sortable: false,
filterable: false,
width: 100,
Cell: row => (
<div>
<button onClick={() => this.onDelClick(row.original.id)}>Delete</button>
</div>
)
}, {
sortable: false,
filterable: false,
width: 100,
Cell: row => (
<div>
<button onClick={() => this.updateCurrency(row.original)}>Save</button>
</div>
)
}
,]
return (
<div>
<AddCurrency addCurrency={this.addCurrency} fetchCurrencies={this.fetchCurrencies}/>
<ReactTable data={this.state.currencies} columns={columns} filterable={true}/>
</div>
);
}
fetchCurrencies = () => {
const jwtToken = sessionStorage.getItem("jwt");
fetch('http://localhost:8080/currencies',
{headers: {"Authorization": jwtToken, "Content-Type": "application/json"}}
)
.then((response) => response.json())
.then((responseData) => {
this.setState({
currencies: responseData
})
})
.catch(err => console.error("error: " + err));
} }
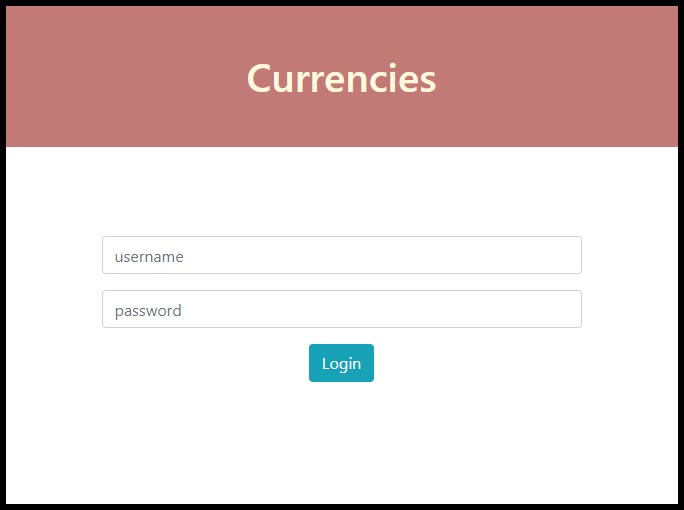
export default Currencies; By going to localhost:3000 you should see the login page. After entering the username and password (in our case, admin: admin - we have set this data in our backend) - you will be authenticated and you will have access to the application:
Summary
Congratulations, we have created a fully working application, secured by JWT. In the next (last) post we will configure PostreSQL.
The source code of the entire application (frontend and backend) is available on Github:
- Frontend: Github Repo
- Backend: Github Repo